Dwarf Fortress (2): The Early Settlement
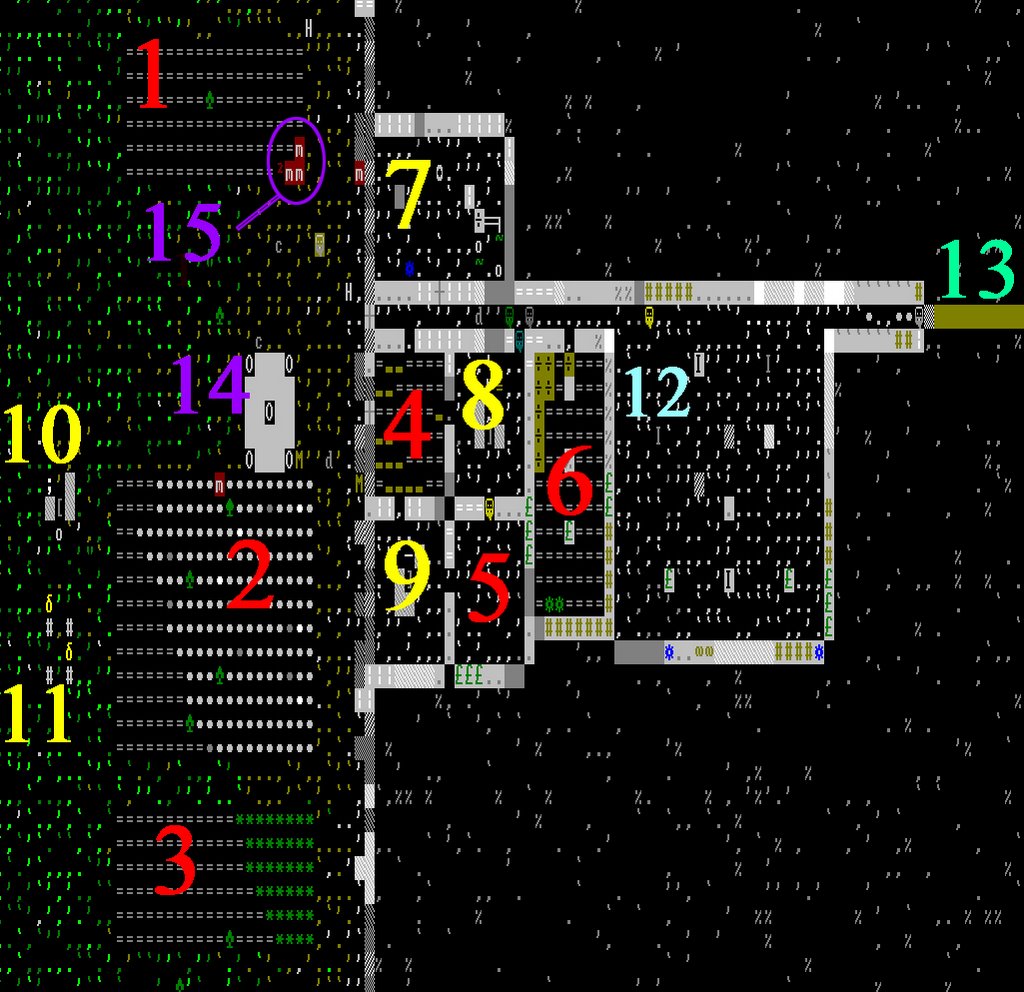
My fortress now has some early features in place, and it’s now mid-summer of 1051. As you can see from the screenshot, I’ve added some numbers to the image so that it will be easier for you to follow along as I discuss what’s been done (and how I do it). Just click on the image to enlarge it and let's get going.
The area represented in the screenshot is a very, very small part of the map. It’s small enough that you can’t even see the second mining shaft to the south or the rivers to the west, and the mountains extends well to the east. That mining area in the northeast extends beyond what you can see.
Before we look at anything else, let’s take a look at mining. If you can’t dig out a home in the mountains, you’re not going to survive for very long.
Take a look at #13, which is a yellow/green corridor on the right side of the screenshot. That’s what a designated mining area looks like, and that color is used for all types of designations: mining, chopping down trees, gathering plants, detailing stone, etc. In this case, I’ve designated a small corridor because that’s going to be the entrance corridor to the living quarters.
Here are a few tips about mining. Most importantly, and this one of the few things you just “have to know,” rooms larger than 6x6 are subject to cave-ins if they are not properly supported. If you look at the dining hall (#12), you can see rectangular supports. Those are there to prevent cave-ins, and there are two ways to get them there. The simplest way is to exclude those areas from digging. Designate the entire room area, but then go back and exclude single squares where you want supports.
Let’s take a look at designating a mining area and you’ll see what I mean. Press “d” on the main command menu. On the designation area submenu, press “d” again. Any area you designate now will be a mining area. Move the yellow “X” until you reach a top or bottom border of where you want to dig, then press Enter, which changes the “X” into a green “+” sign. Now move the cursor to the opposite corner of the digging area you want to designate and press Enter again. The entire area should have that yellow/green color now.
If it’s a big room, and you want to exclude some squares to retain as supports, press “X”. This will turn on the remove designation command. You create the area you want to exclude in the same way I just described—move cursor, press enter, move cursor, press enter again. If you just want to designate one square at a time, move the cursor to the square and press enter twice.
Once you’ve excluded an area, it should change color back to the original so that you can verify it’s been removed from the designated area.
You need to start mining immediately. This is where your skill loadout becomes important—if you created a miner with the highest allowed skill in mining, he’s going to be digging out that mountain at a high rate of speed. So much depends on having usable areas inside the mountain that it’s difficult to overvalue mining.
You can also designate areas where trees should be cut down in the same manner, only you’ll be pressing a different key (“t”) to specify a logging area.
Now let’s take a look at stockpiles. Raw materials as well as finished good are stored in stockpiles, and it’s important to set them up early on. Red numbers 1-6 are stockpiles:
1—refuse
2—mining
3—ore
4—wood
5—finished goods
6—food
Monkeys will steal from the stockpiles, but I don’t think they’ll steal rocks (#2) because they’re too heavy. I’m not sure about ore (#3), but I’ll take that chance. Plus, if they want to steal from the refuse pile (#1), that’s fine by me.
What I consider the more important stockpiles, though, are inside. Wood (#4), finished goods (#5), and food (#6), are all protected—all entrance doors can be set to impassable as soon as the monkeys show up.
Oh, and while I’m talking about monkeys, take a look at #15. Those ‘m” surrounded by red are monkey carcasses—my war dogs were very effective.
So how do you make a stockpile? It’s very simple. To begin, hit “p” at the main command menu to access the stockpile menu, then press the letter corresponding to the stockpile you want to create—for instance, “m” for mining. Now move the yellow “X” into position at the top left corner of the area you want to create and press “Enter.” That will turn the cursor into a flashing “+” sign, indicating that you’re creating an area. Move the cursor to the bottom left of the area you want to create and press “+” again. There you go—you’ve created a stockpile.
Mining stockpiles need to be large, because you will be removing massive amounts of rock from the mountain. My mining stockpile will be full soon and will have to be expanded.
To create a stockpile indoors, you follow the same process, but the area has to be clear of rocks—you can’t create a stockpile in an area that hasn’t been mined yet.
There are many more stockpiles that can be created—animal, furniture storage, gems, bars, cloth, coins, etc.—but that’s enough to get me started.
Now that we have storage areas for raw materials, let’s create some workshops. A dwarf with the proper skill can use a workshop to create items (and a few other things). Numbers 7-11 are all workshops:
7—brewery (there’s also a well in that room)
8—carpenter’s workshop
9—craftsman’s workshop
10--mason’s workshop
11—kennels
How do you create a workshop? Select “b” at the main command menu to get to the building menu, then press “w” to access the workshop menu—this will give you a list of all workshops that can be built.
Here’s something about the build menu that can be somewhat confusing at first—not only is the build menu used to create workshops and other buildings, but it’s also where you place objects, like beds and tables. So the build menu encompasses both buildings that need to be built and objects that have already been built and need to be placed.
If you try to build something and can’t, you’ll get a message explaining what materials or skills are missing. So if you see a message that says “needs architect,” you need to assign that skill to one of your dwarves. You can access them either from the main menu command “j” (for jobs) or “v” (for view).
I usually use the job list screen, so let’s use that as an example. Press ‘j” and you’ll get a list of all current jobs in the queue. You’ll also see what all of your dwarves are doing. Move the highlight to any of them and press “c”, which will center on that particular dwarf. Then press “p” for preferences, then “l” for labor. This will give you the skill list, and you can assign (or take away) skills here.
That’s one of the more convoluted command sequences in the game, but it becomes second nature pretty quickly.
You also might need materials. A well, for instance, requires rock blocks and a bucket, and if you don’t have them, you’ll see that message. Wells are important, both because it allows dwarves to stop drinking dirty river water and because they like to gather around the well.
Why did I build these workshops first? There are logical reasons for each (again, something I love about this game). I built the brewery because dwarves are much happier when they have access to booze. The carpenter’s workshop, for the first year, is primarily to build a bucket (a necessary material for a well), beds (dwarves don’t like sleeping on the floor), and barrels (for storage). The craftsman’s workshop is to enable the creation of different kinds of crafts that can be traded for other supplies when the trade caravan comes. The mason’s workshop is to build all kinds of things: doors, tables, chairs, rock blocks, etc.
You’ll have a much higher supply in your mining stockpile than in your wood stockpile, so make as many things out of rock/stone as possible.
The kennels allow you to train war dogs, which can be very useful when monkeys tear through your camp, harassing dwarves and stealing things. Plus they are still used as pets, so it’s a double benefit. Dogs are also somewhat disposable, unlike dwarves, so using them for security at first instead of a peasant novice might save a few lives.
Once you’ve designated a workshop to be built, a dwarf will eventually come by and build it, but it might not happen right away. You’re not God in this game—people don’t do things immediately just because you tell them to. Consider yourself a Dwarven city manager, of sorts—you set the agenda and it will generally get accomplished eventually. Again, this is wonderful design, because if the dwarfs were automatons, this game would just be a spreadsheet.
So how do you queue up something to be built at the workshop? At the main command menu, press "q", which will activate the yellow "X" cursor. Move that cursor to the workshop (until it's flashing), which turns on the menu for that workshop. Press "a" to add an item for building, then select it from the list. You can create a queue and also adust the build order of the queue.
One other note about workshops. While you can create a stockpile just for finished goods, workshops seem to have their own storage space. For example, if a carpenter builds a bed, you can't really see it anywhere, but if try to place the bed, it shows up as available inventory.
The last thing we haven’t discussed is the trade depot, which allows you to trade with the caravans that will stop by from time to time. You can’t see it in the screenshot, but I’ve build a bridge across a river to the west, because if you don’t, non-dwarven caravans won’t stop by. You can request a bridge be built via the build menu, and you’ll need an adequate supply of some kind of rock.
It’s the same with the trade depot. You’ll need three quantities of rock, not just the one that is usually needed. You’ll see a list to choose from, and when three are checked (select them by pressing Enter), the trade depot shape will appear and can be placed.
There’s much more to talk about involving trade caravans (bridges, roads, personnel), but that’s a discussion for another time.
There are many, many topics I haven’t touched on yet: mining to find the underground river (which is crucial to farming), the details of trade depots, and about a hundred other topics, because this game is so huge and so complex that it offers almost infinite choices when it comes to strategy. Maybe we’ll get to some of those things tomorrow.

<< Home